
The team over at Wotofo kindly sent out one of their latest RTA's free of charge for the purpose of this review.
The Conqueror is described on the Wotofo website as follows:
"The Conqueror utilizes one of the first dual coil postless build decks found in a rebuildable tank system, allowing users to create even more dynamic horizontal coil based systems with the additional deck space, while implementing an independently adjustable juice flow control, a top fill system"
Presentation.
The Conqueror arrived in a cardboard presentation box, with quite and artistic design to the outer sleeve.

The outer sleeve slides up and off the main box, to reveal the contents of the box.

The tank is held firm in a grey foam cut out, and can be easily pulled out, once removed, you can access the rest of the kit, which is housed underneath.


The kit contains :
1 x Conqueror RTA
1 X instruction Booklet
1 X Multi Wrench
2 X Comp Coils
1 X Japanese Cotton
1 X Spares Kit.
Conqueror Specification
Model : Conqueror
Manufacturer: Wotofo
Type : RTA
Body Material : Stainless Steel
Tank Material : Pyrex Glass
Tank Capacity : 4ml
Air Flow Control : yes
Juice Control : Yes
Coil Capacity : Dual
Deck style : Dual Postless
Top Fill : Yes
Connection : 510 Gold Plated Centre pin
Width : 22mm
Height : 60.8mm
Weight : 0.080 kg
Price : $34.99
Supplied by : www.wotofo.com

The Conqueror comes fully assembled in the box, but uncoiled. So with this review we will start by looking at the component parts of the Atomizer, then put a build in it, and have a Vape to see how it performs during every day vaping.

The Conqueror breaks down into four main components.
Drip Tip
The Conqueror comes with a stainless steel wide bore drip tip, that slightly tapers up towards the rounded top lip.

The Drip Tip has a standard 510 connection, with two fat orings which hold it securely in place

Top Cap
The Drip Tip fits snugly into the stainless steel top cap, which has some nice knarling running around the outer edge,

The underside of the top cap has an o-ring, to prevent any leakage, and to maintain the vacuum within the tank.

It features nice wide threading, which screws into the top of the tank with ease.
Tank Section.
The tank section is what gives the RTA, its distinctive look, with is off set windows. The top of the tank body features an outer ring, which when rotated raises and lowers the inner chamber, to adjust the juice flow to the deck.

Sitting within the juice flow control ring, are the top fill holes, which allow for easy juice filling, from either a standard juice bottle or pipette.

The inner chimney runs down through the tank, connecting up with the inner chamber the surrounds the build deck.

The inner chamber has threading running around the inner edge, which screws down onto top lip of the build, when screwed into place.
510 Connection & Build Deck.
The Conqueror features a standard 510 connection, with gold plated centre pin.

Surrounding the 510 connection and base, is the (ACR) Airflow Control Ring, which has 5 large holes on each side, which allows for air flow running directly in under the deck, the ring is tightly fitting, and can be adjusted by rotating the ring in either direction, closing off any number of the wholes to get your desired airflow.

What makes this RTA unique, is the dual Postless deck. Which instead of posts with holes for your coil tails to go through, it just has two positive holes, and two negatives holes, sitting either side of the two massive air holes.

The deck is surrounded by thin wall, that completely surrounds the deck, with four wide slots cut out for the juice flow, each one aligned next to the coil holes. The side wall has smooth threading running around the top edge, which threads into the tanks inner chamber. And allows the juice flow control to thread up and down when adjusted.
The coil tails are held in place by four small grub screws, which are located in the side wall of the base.

The Conqueror Build.
I was initially going to stick a pair of Clapton Coils in the deck, but after a bit of fiddling, I found that I just couldn't get them to fit into the coil holes, well that to say that the coil tails fitted into the holes, but when installed, I couldn't get the grub screws to hold, you have to back them out so far that they just would grip. So I swapped the Claptons out for some standard 24awg coils, to try out on my first build.
To start with I went round and backed out each of the grub screws.

The after wrapping the coils to suit, you need to trim of tails leaving about 8-10mm on each end, you can judge the tail length by sticking the Allen key down into the tail hole, and then sort of measuring it, as you pull it out, to get the depth, just ensure you leave enough length on each tail, so they sit down into the hole, and enough height, to stand clear of the deck and air holes, which do stick slightly proud of the deck.
After a little coil tail bending and tweeking, to line them up with the holes, you can then slot the coils down into the coil holes.

And tighten up the grub nuts, Using the coil bar, you need to just straighten the coil out, and repeat with the next coil.

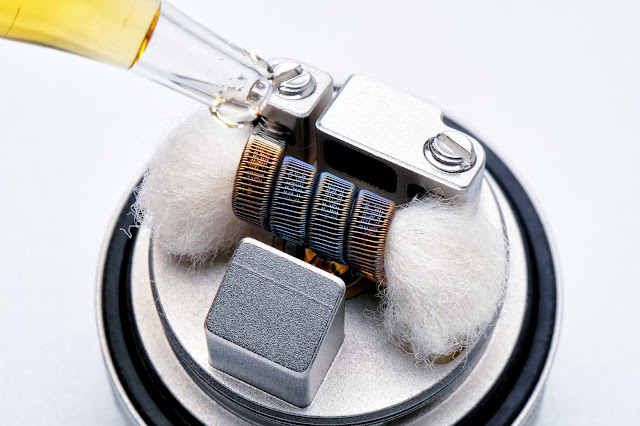
And with both coils, aligned up over the air holes, and with the grub nuts tightened up, you can then check the resistance (0.30ohms), you can then pulse fire the coils to set them in place.

Once you are happy that the coils are glowing right, you can allow them to cool down, and then begin to wick them up. I took one 5ml strip of cotton, and slip it down the middle, to create two thin cotton strips.

Which can the be carefully threaded through the coils, ensuring not to compress the cotton to much.

I then cut the cotton off just wide of the deck, to allow enough cotton to fluff and pack.

After giving the cotton at bit of a back brush, you can then begin to carefully poke the cotton back down onto the deck, keeping it as light as possible.

Once the cotton is poked down behind the juice holes, you can then begin to juice up the wicks, ensuring that they are completely saturated.

Once juiced up, you can then give it a test fire, to draw the juice right into the coils.

Once you happy with your build, and the coils and wicks are all primed, you can then screw the deck into the tank.

Once the tank is in place, you can then close off the juice control, by turning the top ring clock wise.

Once fully closed off, to prevent the deck from flooding. You can then go ahead and fill you tank up with your fav. Juice.

The you can screw the top cap on, and open up the juice flow control and your ready to Vape.
Aesthetics and Build Quality
The Conqueror RTA has a great unique look with its sleek uncluttered design, with off set tank Windows, the top window allowing a view of juice, level, whilst the lower window allows the view of the juice control.
The drip tip that comes with the RTA, really adds to the over look, with its short wide bore design.
The build quality on the Conqueror is second to none with a great finish, and silky smooth threaded.
The only threading I found a little crunchy was on the grub screws, which when removed seemed quite tricky to rethread.
Performance & Real World Experience
The Conqueror produces a great level of flavour, with just the right amount of airflow, running directly up onto the coils. I found the deck although spacious, quite tricky to build on, due to having pre-clip the coil tails, and set them in place with the outer wall remaining in place. But once coiled it was really easy to wick, and whilst using it, I have had zero issues with wicking. I tended to find that I run it with both the air flow and juice control wide open, and had little need to adjust.

Compared with the Wotofo Serpent, I found that the amount of flavour produced, was just slightly below. Which is I believe due to the comparison between single and dual coil.
Conclusion.
Wotofo have managed to produce another class leading RTA, with a tricky, yet rewarding build deck, with great direct airflow, and rich flavour product. Another great addition to the Wotofo range.