
Review of the Vandy Vape Kylin M AIO Kit from Newvaping
The team over at Newvaping very kindly sent over this amazing little kit. which is one of the most comprehensive AIO kits that i have come across.
The VANDY VAPE KYLIN M AIO 70W POD SYSTEM is a true rebuildable pod kit designed for both Pre-Built Coils and DIY: The pre-built coil is the single mesh M coil 0.3ohm which comes with 2ml e-juice capacity and the DIY pod holds 2ml e-juice capacity.
The kit is powered by external 18650 battery with 5-70W power range. Featuring PCBA water-proof design and various protections, Kylin M AIO will provide you safe and fantastic vaping experience.
Main Features of the Kylin M AIO
The true rebuildable AIO pod.
Designed for both DIY and pre-built coil.
Up to 5ML juice capacity designed for rebuildable atomizer and 2.5ML for pre-built coil.
PCBA water-proof out of box.
Up to 70W of output power.
Vandy Vape Kylin M AIO Pod Kit Package Contents

- Vandy Vape Kylin M AIO Pod Kit Package Contents:
- 1 x Kylin M AIO Device
- 1 x Kylin M AIO DIY Pod(5ml)
- 1 x Kylin M AIO Pod(2.5ml)
- 1 x Kylin M AIO Coil 0.3Ω
- 1 x A1 M Pre-built Wire 0.2Ω-VPC.0019
- 1 x SS316L M Pre-built Wire 0.15Ω(TC)-VPC.0021
- 1 x Dual M Pre-built Wire 0.15Ω-VPC.0022
- 1 x Ni80 M Pre-built Wire 0.15Ω-VPC.0023
- 1 x Triple Fused Clapton Pre-built Wire 0.23Ω
- 1 x M Wire Rod
- 1 x Lead Guide
- 2 x Cotton Lace
- 1 x Accessory bag
- 5 x Steel Wires
- 1 x Wire-heating tool
- 1 x Proper user guidance
- 1 x Instructional Manual
- 1 x QC TYPE-C Cable

Vandy Vape Kylin M AIO Pod Kit Specifications:
- Size: 100mm x 46.5mm x 24.5
- Pod Capacity: 5ml(standard) / 2ml(TPD)
- Output Power: 5W – 70W
- Battery: 1 x 18650 (not included)
- Operating Voltage: 3.2-4.2V
- Output Voltage: 0.5-5.5V
- Charging Input Current: 1500mAh
- Operating Mode: VW/VV/TCSS
- Maximum Output Current Protection: <30A
- Capacity: 2mL Rebuildable, 2mL Pre-Built Coils
- Coil: M Coil 0.3 Ohms (35W – 45W) Single Meshed

Colours: Silver moonlight, Fantasy forest, Wormhole, Polar phantom
Price: £59.99 (at Newvaping)
Built In Safety Features
- Open Circuit Protection.
- Over Current Protection.
- 10s Cut Off.
- Short Circuit Protection.
- Over Temperature Protect.
- Low Battery Warning.
Design and Build Quality.
Like all of the Vandy Vape products the Kylin M AIO is a very solid well made little device, which has been machined out of zinc alloy. Measuring in at 100mm x 46.5mm x 24.5, it is compact enough to fit neatly in your pocket, whilst still feeling nice in the hand. with a nice amount of weight. It is one of the devices that feels like it will last.
The back panel is finished in the matching 'Gun Metal' type of finish, with a large, but tasteful KYLIN Logo, running the full height of the device, cleverly done in Mesh lettering, giving credence to the Mesh coils that it runs off.

The front removable panel, comes in a choice of different finishes, which due to the lacquering process, it has an almost hologram effect to it. when it catches the light. There is a slight cut out on the base which allows you to pull the door off. I must say that they have done a great job with the door and the magnets, as it is held on really tight by the two large magnets on the top and bottom.

I also like the fact, but not sure if it was done by design, but the fact that you can take the door off, for when filling the tank. - and place it on the back of the device, and the magnets again will hold it in place.


One the door panel is removed you gain access to Kylin AIO insides, the battery tray, Hidden Screen, and the pod section.

In the bottom right hand corner of the inside panel is a tiny little screen, which i found quite hard to read, but i do have rubbish eyes. I can read the wattage, and just about see the battery bar, but that is about it.

The bright black and white screen does actually show you all the information you will need, wattage, resistance, voltage, temperature and battery level of the device.
Personally, due to the limited size of the screen, i would have preferred it to have shown just a single peace of information at a time, and just given you the ability to scroll through it. So a larger wattage, then big battery bar etc. rather than trying to cramp all the information onto one screen, just think it would have made more sense.
Behind the display is the fully waterproof, PCB. giving you the peace of mind that you device will continue to work even after any accident with liquid.

Running virtually the full height of the device is the battery tray, which hold a standard 18650 battery, which sits neatly inside. over the top of the battery pull to allow easy removal.

The Pod/Tank section sits in the top right hand corner of the device. The pod can snap in and out the device and is seated quite tightly in its surround, so no real need for magnets. and just pushing on the drip tip, once the front panel is removed and it just pops right out.


It is in so snugly that they give you a tool for getting the RBA base pod out, when you don't have the top cap, or drip tip installed.

On the edge of the device, there is a very thin vertical window, that is meant to be for allowing you to view how much juice is in your pod. but to be honest, i cant see a thing through it, as there is no light shining through to display the juice level.

When I want to see how much juice is in the pod tank, i just take the cover off, and give it a bit of a shake. or pop the pod out and hold it unto the light. as it the not the easiest pod the see through, as part of it is sold.
Once the pod is in place, it fits well, and there is no pod rattle. nice and snug. The only movement you get is up and down, when you press down on the drip tip. and the pop moves up and down, on the spring loaded contact which ensure constant connection to the device.

The ergonomic fire button is located on the side of the device, and is more of a trigger, than a button, due to the fact that the bottom edge is hinged, meaning that you can only press the top edge of the trigger/button, to fire it. quite a nice design actually, and feels really natural to press, which ever way around that you hold it.

Vandy Vape Kylin M AIO Pod Cartridge.
The Vandy Vaoe Kylin M AIO Kit comes with two pods included in the kits. The 5ml RBA Pod and 2.5ml Pre-built Pod that comes pre-install. Each pod has the mouth piece / drip tip as part of the pod design.

Each pod features easy side filling, which is accessed through a pull out rubber plug.

Personally, i would have liked to see the whole a little bigger, as on occasion you do get a big of air blockage when trying to fill it.
2.5ml Pre-Built Pod.

This pod allows you to install the Kylin M AIO Coil 0.3Ω that is included in the kit. But you do only get one, so if you are going to use the Pre-Built Pod, you will need to order some more of the coils. The Vandy Vape Kylin M AIO Replacement Coils come in a pack of 4 for only £11.99 (@newvaping.com) which works out at only £2.99 per coil, which isn't to bad. Resistance rating on each coil is 0.3ohms and is rated for 35-45Watts.
The Vandy Vape Kylin M AIO Replacement Pods can also be ordered directly from newvaping.com and come in at £9.99 in a choice of black or silver.
5.0ml RBA DIY Pod

The RBA base is what really interested me in kit, as this is what put the M in Kylin M. Mesh, and the ability to install your own mesh coils in the pod, and wick it up. with no need to be buying any replacement coils, literally pull out the cotton, dry burn the mesh, re-wick and you are ready to go. Plus you have the benefit that the pod holds a full 5ml of juice, compared with the 2ml pod.
Vandy Vape have really gone to town on the accessories that you get to go with the RBA pod.

You get a nice selection of Mesh panels to install

- 1 x A1 M Pre-built Wire 0.2Ω-VPC.0019
- 1 x SS316L M Pre-built Wire 0.15Ω(TC)-VPC.0021
- 1 x Dual M Pre-built Wire 0.15Ω-VPC.0022
- 1 x Ni80 M Pre-built Wire 0.15Ω-VPC.0023

And a standard wire coil.

- 1 x Triple Fused Clapton Pre-built Wire 0.23Ω

Along with the tools you will need to install them.


- 1 x M Wire Rod
- 1 x Lead Guide
Cotton to wick it wick

- 2 x Cotton Lace
and the Steel Wire rods which are used to drop down into the pod, to wick the juice upto the cotton.

- 5 x Steel Wires
This is the first pod system that i have seen that actually used the wire rodes to wick the cotton up, this is the type of stuff you would get in a full blown RDTA.
And not for getting the tool that you will use to hold the pod/coil in place whilst dry burning the mesh/coil

- 1 x Wire-heating tool
Airflow Control.
Unlike alot of the pod AIO on the market which have air-flow controlled on the coil base, Vandy Vape have gone for a more conventional Airflow, with the standard airflow ring around the top cap.

Function and Controls.
The Vandy Vape Kylin AIO POD is super easy to use, and control using a combination of the fire button and the function buttons, The adjustments for the device are as follows:

- Clicks five times to turn on/off
- Click three times to change modes
- Click the up/down to change settings like wattage, temperature
- Click the fire button and down button at the same time to flip the screen
- Click the fire button and up button at the same time to lock
Charging
The Kylin M AIO comes with a type C charging and update port, but as with all devices i would recommend that you charge your battery externally.
The RBA Base Builds.
With as many options that this kit gives you, you will be building for hours, trying out each of the wires and meshs included in the kit. There is litterally something for every one, from cloud chasers to flavour makers.
I think that due to my kit being a TPD Kit, the RBA Base Pod, has a big rubber bung in the tank, to reduce the capacity down, So the first thing i did before I stuck a build on it, was to see if i can remove the block. Turned out that all you needed to do was to unscrew the two contacts at the bottom, and the plastic base comes straight off.

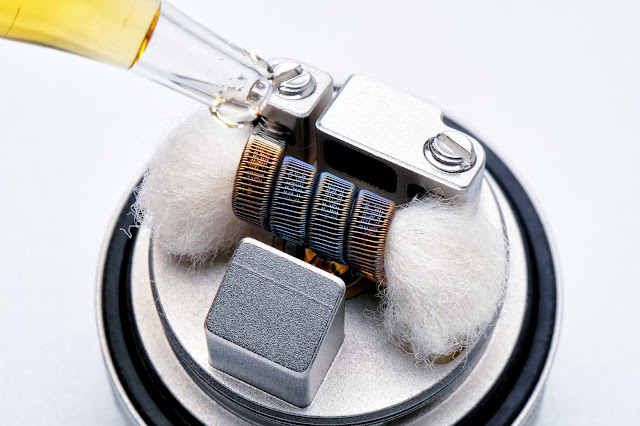
Next you just need to install the wicking wires. which simply drop down into the four holes surrounding the deck.


Just make sure that they are all the way down, so they are level with the top.

Then it is a matter of choosing which mesh or coil you want to use, unscrew the sprung loaded clamps on each side. Then carefully roll the mesh around the mesh rod to get the correct shape.

Then carefully drop the curved mesh into the slots, and tighten down the clamps.

once it is in place you can then put the pod in the plastic clamp, and insert it back into the device and dry burn the mesh, to get out any hot spots.
Once it has cooled, you can then carefully pull through the cotton, making sure that you push it down on the spring loaded deck, whilst pulling the cotton through, making sure that you don't mis-shape the mesh, by pulling it to hard.
It is important that you make sure that the cotton is fully making contact with the mesh, and is sort of pressed up to it, through the force of the spring loaded deck.
Once the cotton is in place you can then trim it down, i start by cutting the cotton, upwards on a diagonal, and the cutting the corners off, to take away some of the mass.


Until you are left with just the right amount of cotton to poke down into the wicking wells, Once you have put it in place you can trim off any excess, like you are giving it a hair cut. You dont want to much and you dont want to little, just a matter of experimenting, you can always go back an trim some off, if you start getting dry hits.
Then prime the wick up, by soaking it with juice. put on the top cap, set your air flow, and you ready to vape.


Every Day vaping Performance.
The Vandy Vape Kylin AIO kit is an absolute pleasure to use, from its pocket friendly size, to endless coil and mesh combinations, it really is a great little kit. With the interchangeable 18650 Battery you'll be vaping all day, well most of it, when vaping on it at 22w it got me all the way through to about 7.30pm before i had to change the battery out for a fresh one. But that is the beauty of a device with an 18650 battery, you can just swap it out.

To start with I vaped the Kylin M with the pre-installed 0.3ohm Coil, which to start with gave a good amount of flavour, if a little muted. which did improve a little when i turned the airlfow rightdown. but i did find that after about 4 to 5 days of vaping on and off, it started to taste a little burnt, and for some reason i was getting a few dry hits, which is virtually unheard of, with pre-installed coils, so not sure if i had a bad coil, which developed hot spots, not sure.
After being less than blown away by the pre-installed stock coils, i went on to the the star attraction. the little RBA base.
Having installed my favourite Mesh coil, and juiced it up with some Cyber Rabbit, i was super impressed with not only the flavour, coming out of, what is a tiny chamber. but also the amount of vapor it could chuck out. It was like chalk and cheese to the stock coils.
Combined with the fact that it can now hold a load more juice, it had transformed it a total pocket rocket. and well impressed with it. The only thing i would say when vaping the Mesh DIY coil, the metal part of the mouth piece did get a little hot, after taking some long old blasts on it. but to be fair to the little pod, and the wire wicking rod, it kept up with the flow rate, with zero dry hits. (trust me you don't want a dry hit off a mesh coil, as it is more flame than vapor)
Final Thoughts.
If you are in the market for an All-In-One device, and want to be able to but your own builds in, or looking for a device to practice your DIY skills then you wont go far wrong with the Vandy Vape Kylin M AIO from Newvaping. and considering the amount you get in the kit is great value.
Positives 👍
- Solid Built device
- Single 18650 battery.
- Everything included in the kit.
- RBA Option.
- Lots of Mesh and Coils.
- No Leakage Issues.
- Great Flavour off the RBA Pod.
- 5ml Capacity on the RBA Pod.
- Look Amazing
- Great Value for money.
Negitives 👎
- Only 2ml in the standard pod (bloody TPD)
- Not the best flavour of pre-installed coil.
- No clear battery markings
- Would like a clearer Screen.
- Juice level window to small.
So if you fancy trying out the Vandy Vape Kylin M AIO kit the follow this link, and pick one up for only £59.99
Dont forget to use MVR20 to get 20% off your purchase.
Disclaimer : The review does contain Affiliate links to newvaping, through Share-a-Sale who will pay a small commission should you go on and purchase a product, this money goes to the upkeep of the blog. Thanks