Introduction
This Rebuildable Atomiser was sent to me for review from Neil at Mechmode.com, who specialises in all things vaping, rebuildable and mechanical. Who is a wealth of vaping knowledge.The Steam Turbine RBA is described on the Mechmode.com website as follows:
The Steam Turbine rebuildable atomizer is a stainless steel genesis style unit. The Steam Turbine features a two hole configuration whic allows you to build single or dual coils using steel mesh or silica wick. It boasts a 3ml juice tank capacity and ample air flow from 2 holes each side of top cap.The draw on this is quite tight and some may want to enlarge the air holes which is easily done with a small diameter drill bit, however this is down to your personal taste. This atomizer also has a high quality glass tank that is protected by a stainless steel sleeve.
This was one of the first rebuildable Genius style atomiser I was sent, for review. And had a mixed relationship with it to start with, taking many attempts, different wicks and coils before success, you do need to be patient and you take your time. Neil at Mechmode was a great help, and was always on hand, to guide me in the right direction. But once mastered with the set up shown in this review, was a truly special vape.
I truely feel that the people you buy your vaping equipment from, to me is one of the most important things, well over and above just finding who sells them the cheapest.
Presentation.
The Steam Turbine came in a nice presentation box, with the steam turbine logo embossed on the top. On lifting of the lid of the box you are presented with the Steam Turbine, along with a bag of spares that contained spare o-rings and screws. The only thing it does not come as standard with is the 510 drip tip. Which will need to added to the order.
Features & Specs
Model : Steam Turbine
Manufacturer : RainbowHeaven
Type : Rebuildable Tank Atomiser
Body Material : Stainless Steel
Tank Material : Glass with metal sleeve.
Terminals : 1 positive centre post , 2 Negative screws
Terminal connection : screw and washer
Coil Configuration : Single or Dual coil set up.
Tank Capacity : 3ml
Connection : 510 threaded
Width : 21 mm
Height : 53 mm
The Steam Turbine comes full assembled and ready to coil, but would always recommend giving it a good wash and clean out first, to get the machine taste out of it, to do this the RBA will break down into its component parts, by simply unscrewing the top cap, and carefully sliding the glass tank up off the o-rings, and over the deck.

Body
The main body of this tank, what what I can see is machined out of one solid piece of stainless steel. With the bottom section of the body being wider than the top deck, with a standard 510 connection of the bottom. With a thread outer ring which allows the tank sleeve to screw down onto. Just above the threading is located the bottom o-ring which holds the base of the tank firmly in place.
The bottom plate and the deck are joined together by the solid centre post.
The top deck has two well fitting o-rings, the bottom one securely holds and seals the glass tank in place, whilst the other one, creates a seal when screwing down the top cap. Between the two o-rings in the top cap threading. All of the threading on the this RBA is machined to a high standard.
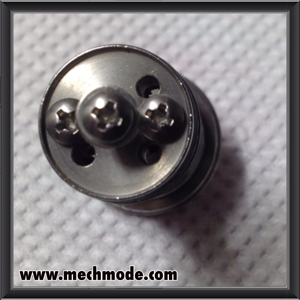
Deck
The deck of the Steam Turbine is laid out with a tall positive centre post, with a single washer and screw which is used to trap the positive wire. It then has two negative terminal screws with washers located either side, screwed directly into the deck.It then has three holes approx 3mm across, one in front of each the negative screws and one off set behind one of the screws.
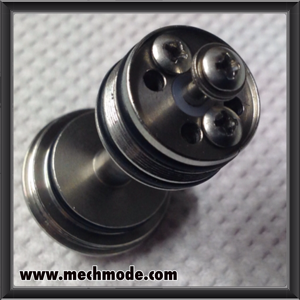
You can set the wicks in any two of the feed holes. Next to each other, or on apposing sides, using the third hole to fill the tank. The third hole is left open with no grub screw, to assist with the juice draw. The deck has a nice short lip around it, allowing easy access when building.
Top Cap
The stainless steel to cap, tapers upwards, with groves detailing around the bottom section, and top section,the centre section of the top cap is smooth, which has an air flow hole on each side. The inside of the top cap has a reduced chamber, and once fitted, and screwed down will leave a small area inside, which I thinks helps with the intense dripper like flavour that this RBA produces. The Top cap has a standard 510 drip tip recess on the top. And the inside bottom threading is well machined.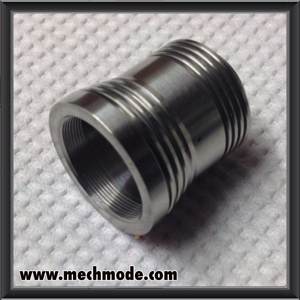
Glass Tank
The Glass tank, is of a high quality, and well manufactured. It is a good 3 to 4mm thick, and fits snugly over the body and o-rings. It is well worth lubricating the o-rings with a bit of ejuice, when fitting. Although the Glass if thick and fits well, it always makes me nervous, when you are sliding it into place. But when in place I have found no leakage whilst I have been using it.
The Tank Sleeve.
The Steam Turbines tank sleeve is what give it, it's distinctive retro look, and is machines out of thin stainless Steele. With it's jelly bean cut outs, to allow you to see the ejuice, and pin hole design between each cut out. This section not only adds to the overall look of the Turbine but also protects the glass tank from any knock or bumps. It is secured in place to the body with some finely machined threading.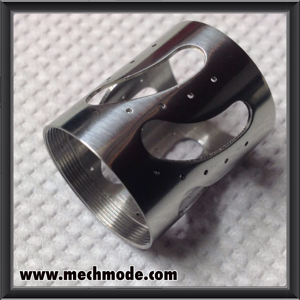
Aesthetics & Build Quality
The Steam Turbine not only vapes really well, but I think looks amazing. With its retro high quality machined top cap and well engineered tank sleeve.
I like the fact that the top cap not only screws down but is also sealed off with the top o-ring, as there is nothing worse than a leaking atty. giving you the confidence to slip it in you pocket, with out worrying that the top cap will slip off or the atty will leak.
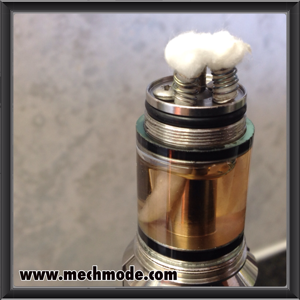
The Steam Turbine Build.
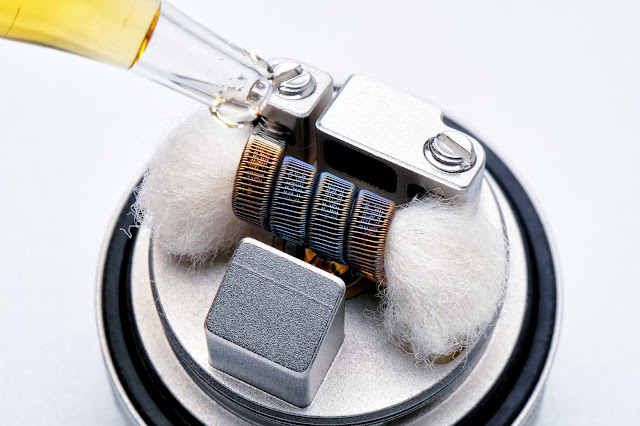
I finally decided to set this build in dual coil, with organic cotton wool wicks.I started by building two coils, of 0.28 gauge wire, each one wrapped 8 times around a 4ml drill bit.
I then set each coil in place with two of my small screw drivers dropped into each of the feed holes. Whilst the screw drivers held the coils directly over the the holes, I connected the the two bottoms of the coils to the negative deck screws, just trapping them under the washers.
Then attached the top of each coil to the centre post, again trapping both wires under the top washer.
Once the coils where firmly in place, I removed the screw drivers, and pulse fired the mod to set them in place, and check they where heating correctly.
Then got two small pieces of cotton wool and rolled them between the finger and thumb, until they where about 3ml thick, then poked each one through the coils and through the feed holes. And gently pulled them through from underneath the deck. The snip off the excess at the top and bottom, to allow a good length of wick in the tank, and a short section, just above the coil.
Then you can slide the tank into place, and fill through the third hole, you will need a needle point bootle to be able to fill it neatly.
Then just prime the wicks with a few drops of juice, and wait a short while for the wicks to do there job. And your ready to vape.

Performance & Real World Experience
Once you have perfected the vertical coil build, the steam Turbine, really does vape well, producing a tonne of warm thick vapor.It started to vape the Turbine on the standard air holes, but just found the draw to tight, I increased my air holes to about double the size on both sides, by drilling them out, as I prefer a more airy draw.
The Air flow holes, when the cap screwed down, are either side of the coils, so seem to draw air across and over, rather than directly behind, which I feel would give to much heat.
Once I had built the dual coils, it was really easy to change out the wicks, when I wanted to change the flavour, simply carefully pull them back through the coils. Dry burn off the coils, to remove any of the old flavour. Then just rewick as before, really nice and quick and easy.
I found that the Steam Turbine produced a nice level of flavour, with very few dry hits. You do find as with any rebuildable Attys or drippers, you need to limit the length of the burn to allow the juice to rewick.
Recommendation
Having used the ST for the last couple of days as my All-Day-Device, I can't really fault it, no leaks, great flavour and tonnes of vapor production. Once you have mastered the vertical coil builds, you will have a great Rebuildable Tank, that is really easy to rewick.From my experience, as a rebuildable beginner, I would recommend starting with a dripper, before moving onto the rebuildable tanks, as I find them more forgiving. But once you have mastered the rebuildable tanks, you will find it very hard to go back to using the per made tank systems. Due the the level of flavour and vapor that you get from rebuildable Tanks.
MVR Rating
Presentation: 7 / 10Features & Spec: 7 / 10
Aesthetics : 9 / 10
Build Quality : 9 / 10
Ease of Build: 7 / 10
Performance : 9.5 / 10
Overall : 8 / 10
Vendor Details
Supplied by : www.mechmode.comAvailable to buy online for £20.25 - >>> Click Here <<<